MD Teach Official

Tech By : MD Muneer


ISO PRE-BOARD 2019 top 10

March 03, 2019
ISO PRE-BOARD 2019
top 10


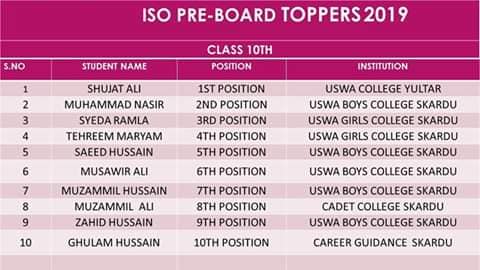
Result Check here This Link
                                  ⏬
                                  ⏬
                                  ⏬
http://bold.kizpak.pk/Home/StudentMarkSheet/100

FEDERAL BOARD OF INTERMEDIATE AND SECONDARY EDUCATION

February 02, 2019
FEDERAL BOARD OF INTERMEDIATE AND SECONDARY EDUCATION 


DATE SHEET FOR SECONDARY SCHOOL CERTIFICATE ANNUAL EXAMINATION 2019 

It is hereby notified for general information of all concerned that SSC PART I & II ANNUAL EXAMINATIONS, 2019 of the Federal Board of Intermediate & Secondary Education, Islamabad shall commence with effect from Tuesday, the 12th March, 2019 according to the schedule given below:- 


PHOTOGRAPHY

January 18, 2019


Photography is the art, application and practice of creating durable images by recording light or other electromagnetic radiation, either electronically by means of an image sensor, or chemically by means of a light-sensitive material such as photographic film. It is employed in many fields of science, manufacturing (e.g., photolithography), and business, as well as its more direct uses for art, film and video production, recreational purposes, hobby, and mass communication thank. MD Muneer Photography Full Complete Session 2018

how to make youtube channel custom url 2019

January 18, 2019


How to change YouTube custom URL

  1. Meet eligibility requirements
  2. Sign in to YouTube
  3. Click on your profile picture in the top right corner. Select Settings, then select Advanced Settings
  4. Under Channel Settings, click on the link "You're eligible for a custom URL"
  5. In the Get a custom URL box, you'll see URLs you can choose from. You may have to add letters or numbers to make it unique
  6. Check the box to agree to the Custom URL Terms of Use
  7. Click Change URL
  8. Click Confirm Choice

How to make youtube video thumbnails

January 04, 2019


First open the photoshope and create new page then open your channel logo and some picture related your videos topics and adjust the page size , select the text tools then write the video thumbnails name so this task  complete setting the font size to go on the panel bar on photoshop then your own style select fonts and the go tools bar select the shape tools the draw the rectungular shape the go panel bar setting the opective of the rectunglar shape and the layer panel change the normal effect select own your effect the at last ajjecte the picture and save the photo in jpg.and go the browzer and open the channel and select the video edit then change the thumbnails .

work done 1OO%

How to Write Urdu in Adobe Photoshop CS6 Without Inpage-Urdu_Hindi Tutor...

October 31, 2018

How to write Urdu and Arabic in Photoshop CS6


For many years we have used InPage to write Urdu and to create graphics with Urdu text. InPage is still widely used in the Industry but Unicode Urdu is also getting popular, with Unicode you don’t need any software or special operating system. Just install the Urdu keyboard of your choice and start writing Urdu in notepad or any other text editor. You can write Urdu in Facebook status, Twitter updates or create your own Urdu website or blog. Now a days there is a wide range of beautiful and stylish range of Urdu fonts is available for free.
But how to create graphics with Urdu text over them? should we go back to InPage? The answer is “No”. Earlier there were special versions of photo editing software like Photoshop were available labeled as ‘Middle East’, with which you can write RTL languages like Arabic, Hebrew and Urdu. Now in Photoshop CS6 Adobe added the Middle Eastern type in all versions, you just need to activate the feature. Here is how you can do it.
For Windows Users:
  • To reveal Middle Eastern type options in the Photoshop interface, do the following:
  • Choose Edit > Preferences > Type
  • In the Choose Text Engine Options section, select Middle Eastern.
  • Click OK, and restart Photoshop.
  • Choose Type > Language Options > Middle Eastern features.
adobe-type-middle-east
For Mac Users:
  • Photoshop > Preferences > Type
  • In the Choose Text Engine Options section, select Middle Eastern.
  • Click OK, and restart Photoshop.
  • Choose Type > Language Options > Middle Eastern features.
rtl
Now to create content in Arabic and Hebrew, enable right-to-left (RTL) text direction. While RTL is the default direction of text, many documents also include left-to-right (LTR) text. You can seamlessly switch between the two directions.
When you are working in Arabic or Hebrew, you can select the type of digits you want to use. You can choose between Arabic, Hindi, and Farsi.
digits
You can download the 30 days trial version of Photoshop CS directly from this link. To install Urdu keyboard and a few stylish fonts download Pak Urdu Installer and start typing urdu in a matter of seconds. If you encounter any problem following the guide and writing Urdu and Arabic in Photoshop CS6, let me know via comment.

How to extend battery timing

October 19, 2018

11 Tips to Boost Your Android Phone's Battery Life 

  Today's Android phones pack big bright screens and high-end features that suck plenty of power; here's how to squeeze the most juice out of your battery.

 Top-notch Android smartphones like the Samsung Galaxy S5 and HTC One (M8) are powerful, but unfortunately, they don't have endless battery life. In fact, many Android phone users would be happy to make it through a single day, hoping that a nightly recharge is sufficient. Sadly, it sometimes isn't. A number of factors have conspired to reduce gadget endurance over the past several years. Thinner designs with less room for batteries, larger and brighter screens, faster quad-core processors, more software that runs in the background, and power-hungry GPS radios all share responsibility. The move from 3G to 4G networks a few years ago—particularly of the LTE variety—has also taken its toll. But there's much more to poor battery life results than that. Fortunately, there's plenty you can do to stem the flow of juice from your Android device. To write this article, I used a Google Nexus 5$94.99 at Amazon, as it's running the latest version of Android 4.4 KitKat with no extra interface enhancements, but these tips should apply across just about any Android phone. Try these tips to extend your handset's battery life: 


  • See what's sucking the most juice. Navigate to Settings > Battery to see an organized breakdown of what's consuming your phone's battery. Applications and features will display in a descending list of battery hogs. If you see an application you barely use or a feature you never use, you'll want to uninstall the app or turn off the feature.
  • Reduce email, Twitter, and Facebook polling. Set your various messaging apps to "manual" for the polling or refresh frequency, just as a test, and you'll instantly extend your device's battery life by a significant amount. Once you see what a difference that makes, try re-enabling just the most important ones, and possibly reducing their polling frequency in the process.
  • Turn unnecessary hardware radios off. It's great that today's phones have LTE, NFC, GPS, Wi-Fi, and Bluetooth, but do you really need all five activated 24 hours per day? Android keeps location-based apps resident in the background, and the constant drain on your battery will become noticeable, fast. If your phone has a power control widget, you can use it to quickly turn on/off GPS (the largest power drain), NFC, Wi-Fi, Bluetooth, and LTE. On stock Android, swipe down to bring up the Notification bar, and then tap the icon on the top right corner.
  • Use the extra power saving mode if you have it. The aforementioned Galaxy S5 and HTC One (M8) both have Ultra Power Saving and Extreme Power Saving modes, respectively, that limits the phone to texting, phone calls, Web browsing, and Facebook. This can squeeze extra hours or even a day of standby time out of just a few remaining percentage points of battery. 
  • Trim apps running in the background. From Settings > Apps, swipe to the left; you'll see a list of apps that are currently running. Tap on each one to see what they're for; you can stop any apps that you don't need running in the background all of the time. 
  •  Dump unnecessary home screen widgets and live wallpaper. Just because they're sitting on the home screen, seemingly inactive, doesn't mean they're not consuming power. This goes for widgets that poll status updates in the background, as well as ones that just sit there but look pretty and animated—not to mention animated live wallpaper. (But don't dump everything, as part of what makes Android great are the home screen customizations; just remove the ones you don't use.)
  •  Turn down the brightness and turn off Automatic Brightness. It's probably obvious at this point, but you'll be surprised by how much this one alone helps to improve battery life.
  •  8. Update your apps. Applications often get updated to use less battery power, so you should make sure your apps are up to date. Even if you configured the phone for automatic updates, some apps still require that you manually install updates. Check for app updates in Google Play by hitting the menu key and going to My Apps.
  •  Keep an eye on signal strength. If you're in an area with poor cellular coverage, the phone will work harder to latch onto a strong-enough signal. This has an adverse effect on battery life. There's not much you can do about this one, but keep in mind that this could be the culprit behind a seemingly weak battery; it's worth popping the phone into Airplane mode if you don't need data or voice calls. 
  •  Check the reviews. We conduct battery life tests on every single Android phone we review. Unsurprisingly, the results vary widely between handsets, even on the same network. When choosing a phone, make sure that real world talk time is sufficient. You can't go by what the manufacturer says; we see variances on the order of several hours of usage in both directions on a regular basis.
  •  Buy a battery case or larger extended battery. Battery cases combine a hardware enclosure, which protects your phone, with an extended battery that can double your phone's endurance. You can find models compatible with popular Android phones from a variety of manufacturers, such as the Mophie Juice Pack and Incipio Offgrid Battery Backup Case (both for the Samsung Galaxy S4).

How to make folder icon in photoshop (by MD Tutorials House)

September 22, 2018
How to Change Folder Icon to a Custom One

  • Choose the folder you want to customize

FolderIco offers you two options: select one of pre-defined icons, or create your own folder icon. First of all, right-click the folder you want to customize and select "More Icons" in the FolderIco menu. This will bring up the folder customization dialog. What's next?

  • Step 2: Unleash your imagination!

There are multiple ways to make a folder icon look unique.
a) You can add an overlay image to the folder to make the icon visually display what's inside the folder.
Click the "Load Overlay" button and select an image you want to add. Adjust the size and the position of the overlay for the best fit.
b) You can change the color of the folder. Click "Select Color" and pick the one that matches your idea of that folder.
c) Or you can do both:
Looks great, doesn't it? Think of plethora of possibilities you now have! Decorate a notebook of your kid with animals or toys, apply custom images on your working computer to quickly navigate through projects, use different color schemes to indicate statuses of folders. Or…
d) Use any image as a folder icon
Click the "Load Image" button and open a PNG file with the custom folder icon from any icon pack you can download on the Web. Save the icon for further use to any library.
Oh, and you can also set your own folder tool tip as well!


How To Upload Video on You-tube in Urdu_Hindi Tutorial-YouTube

September 18, 2018
1. Save the video to your computer.
2. Sign into YouTube.
3. Click the Upload button.
4. Select a video file.
5. Click Open.
6. Enter a title and description.
7. Adjust additional settings.
8. Click Save Changes.


Copy the video from your camera to your computer. 
Before you upload the video to YouTube, make any edits that you would like, and then make sure that it is converted into a proper format. There are a wide variety of programs and websites that can convert video for free. YouTube accepts the following formats:
  • .AVI (Audio Video Interleaved)
  • .3GPP (3rd Generation Partnership Project)
  • .MOV (QuickTime Movie)
  • .MP4 (Motion Picture Experts Group Part 14)
  • .MPEG or .MPG (Motion Picture Experts Group)
  • .FLV (Adobe Flash)
  • .M4V (h.264)
  • .WMV (Windows Media Video)
  • .WEBM (HTML5)

How TO CREATE GOOGLE ACCOUNT IN Urdu_Hindi Tutorial-YouTube

September 18, 2018
To create a Google account:

  1. Go to www.google.com. ...
  2. Click Create an account.
  3. The signup form will appear. ...
  4. Review Google's Terms of Service and Privacy Policy, click the checkbox, then click Next step.
  5. The Create your profile page will appear. ...
  6. Your account will be created, and the Google welcome page will appear.

How to 3D text animation in Urdu_Hindi Tutorial-YouTube

September 18, 2018

3D Text Animation

These three stories show similar 3-dimensional animations, each adding a little more complexity and visual impact than the prior one.

Rotating on Each Axis

The first story rotates the text over 10 seconds, to xy, and z rotations of 540540, and -540 degrees respectively. When those angles are combined, the result looks the same as [0,0,0] so the animation will not be jarring when the animation is looped.
Try changing the duration and angles.

One Script per Axis

The second story can be viewed by clicking the button labeled 2 under the editor. It rotates the text to the same angles. However, it does so using three separate scripts, which execute simultaneously. This allows each to be animated slightly differently, with varying durations and delays. The yaxis uses a "bounce" ease for a nice effect.

Rotate a Layer

The third story applies the same rotation to a layer, instead. The layer is configured with a semi-transparent yellow color. The layer has two text items that are positioned on the z axis, relative to the layer. Since the text items are on the layer, they move with the layer as it rotates.
The text items are initialized with a class so the common property values don’t need to be repeated.

How To Decrease Video Size WhitOut Loos Quality Urdu_Hindi Tutorial-YouT...

September 18, 2018

How to Reduce / Compress Video File Size Without Losing Quality?

Why Video File Size is Important?

The last few years, as high resolution, HD and 4K video files became the standard, the quality of the average video file dramatically improved. But with these advantages, there are also some challenges. The average video file size increased, and it became harder to send it to a friend online, share / upload it to video websites quickly, or even just casting it to our favorite video streamer (Such as Google Chromecast). As an example, if you have a 1GB video file and you want to upload it to a website at a rate of 500KB/s, you’ll end up waiting about 35 minutes. That’s a bummer.
So what can we do?

What Are the Factors That Impact Video File Size?

There are many factors that impact the final video file size. Some of them are related to the quality of the video, such as the bitrate, the frame rate and many more factors. Others, are more format / codec related, which actually define what is the video file format (AVI / MP4 / FLV / MKV, etc.) and which codec is used to compress the video file (H.264, H.265, etc.).
Each format is used for different use cases, but in the general use case, we recommend to use the MP4 format with H.264 codec. This combination will provide the best mix between compression and video quality, so that you can end up with the best video quality, while keeping the video file size to the minimum required.

How to Compress Video File Without Losing Quality?

So what can we do to decrease / compress the video file size, without losing any quality you’re asking? We recommend to just convert the video file to MP4, with an H.264 codec. That action will save you 15% to 50% of the file size, without losing any noticeable quality.
So how can you convert your file to MP4? We humbly recommend VIP Video Converter. To perform a test and prove our theory, we performed a test. We downloaded a trailer of the movie The Beauty and the BeastThe original file size for this video is 20.7MB. By using the following steps, we converted the MOV file to MP4 file, using a preset that doesn’t decrease any quality from the video. The result was that we got an MP4 file with the size of 17.5MB. So, imagine what this conversion can do with larger video files? In this example, we gained 17% without losing any quality whatsoever, while converting it to MP4, which is one of the most common and standard formats – you’ll be able to play it practically on any device you can think of.

How To Install Adobe Photoshop 7.0 Urdu_Hindi Tutorial-YouTube

September 18, 2018

How to Install Photoshop 6 or 7 on Windows 7


If you've been trying to install your old copy of Photoshop on Windows 7, you may be banging your head against your desk trying to get it to work. The problem exists on the most basic level of the operating system, but there are some workarounds. Follow this guide to get your software running.

1
The Problem

  1. 1
    Understand why it won’t install. Adobe Photoshop 6 and 7 use 16-bit installation programs. These programs have no issues running in 32-bit installations of Windows 7, but they cannot run in 64-bit installations of Windows 7.
  2. 2
    Find your version of Windows. If you have a 64-bit installation of Windows, you will have to use workarounds to be able to install Photoshop. Take a look at our guide to determine which version of Windows 7 you are running.

2
Using a Virtual Machine

  1. 1
    Set up a virtual machine. A virtual machine is an emulated computer within your computer. In other words, your computer will mimic a Windows XP computer through a software program. This virtual machine is treated as its own separate computer.
    • If you have Windows 7 Professional, Ultimate, or Enterprise, you can download the Windows XP Mode and the Windows Virtual PC software. If you are not running these editions of Windows 7, you’ll need to download a third-party virtual machine.
    • Download the Windows XP Mode software from Microsoft’s website. You will need to validate that you own a copy of Windows 7.
    • Select the edition of Windows XP you’d like to install. Home or Professional will both work for Adobe Photoshop 6. Run the program when it is finished downloading.
    • Download Windows Virtual PC software from Microsoft’s website. You will need to validate that you own a copy of Windows 7.
    • You will have to choose to get the x64 or the x86 version of the Virtual PC. Install the x64 version, since you are running a 64-bit installation of Windows.
    • You will be required to install a Windows Update during the Virtual PC installation process.
    • If you are using a third-party virtual machine, you will need to install your own copy of Windows XP on the virtual machine. Refer to our guide on Installing XP for detailed instructions on how to perform the install.
  2. 2
    Run the Virtual PC for the first time. Select the Windows Virtual PC folder in your Start menu, and then select Windows XP Mode from the folder that opens. You will be asked to accept the license agreement, and then Windows XP will begin installing on your Virtual PC. After the installation is complete, a window will open on your desktop showing your Windows XP desktop.
    • You should install an antivirus program on your virtual Windows XP, even if you already have an antivirus program installed.
  3. 3
    Install Photoshop. Once virtual Windows XP is installed, you can install your copy of Photoshop. Insert the CD or download the install file using the browser in your virtual Windows XP. Run the installation program just like you would if you were installing regularly. Once the installation is complete, you can close Windows XP Mode.
  4. 4
    Run the program. To run Photoshop, click your Start button. Select Windows Virtual PC. You will now see a folder labeled Windows XP Mode Applications. Click the folder to expand it, and select Photoshop from the list.

How to make intro and different logo in Urdu_Hindi Tutorial-YouTube

September 18, 2018

Quick Logo Animation

The Quick Logo Animation template features soft light animations, and a clean, modern look. It is a good way to quickly increase your website traffic and engage your customers. You can use it for presentations, online channels, company introductions and more. Simply upload your logo on transparent background, choose your preferred color and we will take care of the rest. Template is available in four versions. Try it today - it’s free.

Whatsapp Amazing Tricks That Blow Your Mind

September 18, 2018

Secret WhatsApp tricks you (probably) didn't know about


We've rounded up some top tips for everyone's favourite instant messaging service


There are over a billion WhatsApp users worldwide right now. The bad news? Your mum has already found her new favourite way to spam you. The good news? You can easily avoid her on the down-low, and that’s just one of the messaging service’s many secret tips you probably don’t know about.
From disabling its ‘last seen’ feature to bookmarking messages you don’t want to forget about, there are loads of tricks to make your favourite IM app more useful than ever. You just have to be in the know.
Fortunately for you (and indeed for us), we’ve scoured every inch of WhatsApp to gather up its most useful features. Read these top tips and you’ll be a pro in no time at all.

1) BEGONE, BLUE TICKS OF MISERY

We know how it is. You're at figure skating practice, your phone buzzes, and you glance down briefly before nailing a spectacular triple axel.
Clearly, you've not got time to respond immediately. But at the same time, you don't want the sender to realise that you've already looked at the message, lest they think you're ignoring them when you fail to reply for two more hours. That's the privilege the blue ticks take away.
Recently though, the chat app has realised the error of its ways and silently come up with a workaround. The liberty of message-mulling is ours again.
HowIn the Settings menu, go to Account, then Privacy and turn off Read Receipts. The only snag is you’ll no longer get them for other people either.
Want to get sneaky? If you need to read something on the downlow without giving up read receipt privileges, simply put your phone in Airplane Mode before reading the message and you'll dodge a blue tick. Just make sure you've closed the app before you turn your data back on. We won't tell anyone.

2) FIGURE OUT YOUR BFFS


In the year 2017, friendships aren’t measured on loyalty or time, it’s all about how much data you’ve shared. WhatsApp has that info - and you can use it to make your own ranked list of your favourite friends. No, there's nothing weird about that at all. What's more, if you click through you can mass delete stuff that’s taking up too much space.  
How: Head to Settings > Data and Storage Usage > Storage Usage and you’ll see a list of your most important groups and contacts ranked according to the data you’ve expended on them. Ah, the romance of modern living.

3) SEE WHEN YOUR MESSAGES ARE READ

In group chats, those grey ticks only turn blue when every member of the group has read your message. But there lurks within WhatsApp a handy way to find out who’s neglecting you...
How: On Android, hold down on a message you've sent and select Info, or on iOS, simply swipe left on the message you want the details on. It'll show you who it's been delivered to, who's read it and when. This also works with individual chats.

4) HIDE YOUR PROFILE PIC


Batman. David Bowie. Pepe the Prawn. All people who have built their much-vaunted careers on an air of mystique and otherness. You can bet they’d have their WhatsApp profile pics set to private, instead of treating the world to a bedraggled photo of them and a bottle of Lambrini. So, as the saying goes, always be yourself unless you can be like Batman.
How: Head to Settings > Privacy > Profile Photo > Nobody.

5) MUTE GROUP CHATS

With WhatsApp groups only capped at 50 participants, they can sometimes get pretty busy. Prevent yourself from being woken up by incessant messages by muting particular groups. 
How: Tap on the group chat of your choice, then the name to bring up Group Info where you will find the option to Mute the chat for either eight hours, one week or a year. Although if you're choosing the latter, you might as well leave altogether.

6) GET SHORTCUTS TO CONVERSATIONS


If you’re on Android you can create shortcuts to popular chats and let them live on your homescreen: useful if there are certain people you chat to more often.
How: Tap and hold on the chat (group or individual) of your choice and a tab will pop up. Select the Add Conversation Shortcut option and the chat in question will appear as the person's profile photo on your mobile desktop.